There is one big difference to a curtain wall and a basic wall as far as Revit is concerned. You can’t host a regular door to a curtain wall nor can you host a curtain wall door to a basic wall. The reason is because a curtain wall has no core boundary. In fact the parameter to edit the structure doesn’t exist.
There are 3 curtain wall types that exist right out of the box, Curtain Wall 1, Exterior Glazing, and Storefront. The next three post will discuss each one. 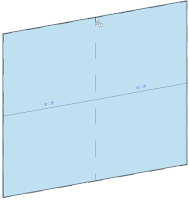 Curtain Wall 1 is the most basic curtain wall out of the three. This curtain wall comes with no curtain grids and therefore no mullions. You create it the same way you would create a basic wall. Select the wall button on the design bar and choose Curtain Wall - Curtain Wall 1 from the Type Selector. On the Options Bar you can adjust the options to suit your needs. Notice that you can’t change the location line. Wall centerline is selected by default and grayed out, but all other options are the same as a basic wall. Once placed you’ll notice it’s just a wall of glazing. You’ll first need to add curtain grids to be able to add mullions later. You can go about this a couple different ways.
First you can click on the Modeling tab of the design bar and select the Curtain Grid button. Place your cursor over the edge of the glazing and left click to place. If you hover over the middle of the Curtain Wall you’ll notice your cursor snaps to the middle of the wall. The cursor snaps to one third and two thirds of the wall as well. After placing the curtain grids you can select each one individually and adjust it using the temporary dimens
Curtain Wall 1 is the most basic curtain wall out of the three. This curtain wall comes with no curtain grids and therefore no mullions. You create it the same way you would create a basic wall. Select the wall button on the design bar and choose Curtain Wall - Curtain Wall 1 from the Type Selector. On the Options Bar you can adjust the options to suit your needs. Notice that you can’t change the location line. Wall centerline is selected by default and grayed out, but all other options are the same as a basic wall. Once placed you’ll notice it’s just a wall of glazing. You’ll first need to add curtain grids to be able to add mullions later. You can go about this a couple different ways.
First you can click on the Modeling tab of the design bar and select the Curtain Grid button. Place your cursor over the edge of the glazing and left click to place. If you hover over the middle of the Curtain Wall you’ll notice your cursor snaps to the middle of the wall. The cursor snaps to one third and two thirds of the wall as well. After placing the curtain grids you can select each one individually and adjust it using the temporary dimens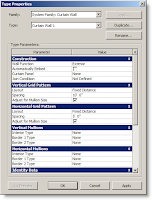 ions.
The other way is to go to the Element Properties → Type Parameters to change the look of the wall there. Here you have the ability to change the layout of the vertical and horizontal curtain grids as well as the mullion type for the curtain wall. You should know however, that by using this method you are pinning the curtain grids to their specific locations. You can still move them using their temporary dimensions, but you’ll have to unpin them first.
Remember, if your curtain wall has a radius to it, it will look straight until you add curtain grids. It’s a segmented radius like you might expect from a curtain wall. So there you have it. If you’ve never created a curtain wall before, this should help you. If you have, I hope you learned something new.
ions.
The other way is to go to the Element Properties → Type Parameters to change the look of the wall there. Here you have the ability to change the layout of the vertical and horizontal curtain grids as well as the mullion type for the curtain wall. You should know however, that by using this method you are pinning the curtain grids to their specific locations. You can still move them using their temporary dimensions, but you’ll have to unpin them first.
Remember, if your curtain wall has a radius to it, it will look straight until you add curtain grids. It’s a segmented radius like you might expect from a curtain wall. So there you have it. If you’ve never created a curtain wall before, this should help you. If you have, I hope you learned something new.
I recently had a conversation with a colleague in the office about how to create a wall with a particular shape to the surface. My first question to this person was why would you want to do this? I mean it is possible to do it, but is it worth weighing down the model when you can show the shape of the wall in a detail view with detail lines? So, if you’re trying to use this shape to cover the entire wall, stop thinking about it. All you have to do is use lines to represent the shape and pattern to create the look you’re after. Now, if you need to create this affect for a portion of the wall you can always use a Host Sweep. This is nothing more than a profile you create and place on the wall while in a 3D, section or elevation view. This allows you to add the profile to any wall you want vertically or horizontally. Here’s how you do it.  First open a new family template by clicking File → New → Family and selecting Profile.rft from the list of template files. Once in the Family Editor you’ll notice vertical and horizontal reference planes. Think of the vertical reference plane as the wall surface. The horizontal reference plane will either be the top or bottom of the sweep. In my experience if you draw you profile to the right of the vertical plane the profile will end up on the surface of the wall, not inside the wall. Now all you have to do is draw the profile you want to see on the wall. Remember it has to be a closed loop. This means no intersecting lines or gaps. Once you’ve drawn the profile, save it and load it into your project. In the project, navigate to the Modeling tab on the Design Bar and click the Host Sweep button. Choose the
 profile you’ve just loaded from the Type Selector. Place your cursor over the wall you want to add the profile, and it should appear on the wall. Notice on the Options Bar you can choose horizontal or vertical. Once you’ve placed it you will have to go to the Options Bar and click the Start Next button to continue with the next placement of your profile. This is an easy way to get a pop out or whatever shape you want on your wall without too much trouble.
Welcome to revitED!
RevitED (Revit Education) and general BIM topics. I've been using Revit now for 11 years, and though I feel I've got a pretty good handle on the software it seems each day I learn something new. I want to share that with the readers of this blog and hope you learn something new as well.
 Curtain Wall 1 is the most basic curtain wall out of the three. This curtain wall comes with no curtain grids and therefore no mullions. You create it the same way you would create a basic wall. Select the wall button on the design bar and choose Curtain Wall - Curtain Wall 1 from the Type Selector. On the Options Bar you can adjust the options to suit your needs. Notice that you can’t change the location line. Wall centerline is selected by default and grayed out, but all other options are the same as a basic wall. Once placed you’ll notice it’s just a wall of glazing. You’ll first need to add curtain grids to be able to add mullions later. You can go about this a couple different ways.
First you can click on the Modeling tab of the design bar and select the Curtain Grid button. Place your cursor over the edge of the glazing and left click to place. If you hover over the middle of the Curtain Wall you’ll notice your cursor snaps to the middle of the wall. The cursor snaps to one third and two thirds of the wall as well. After placing the curtain grids you can select each one individually and adjust it using the temporary dimens
Curtain Wall 1 is the most basic curtain wall out of the three. This curtain wall comes with no curtain grids and therefore no mullions. You create it the same way you would create a basic wall. Select the wall button on the design bar and choose Curtain Wall - Curtain Wall 1 from the Type Selector. On the Options Bar you can adjust the options to suit your needs. Notice that you can’t change the location line. Wall centerline is selected by default and grayed out, but all other options are the same as a basic wall. Once placed you’ll notice it’s just a wall of glazing. You’ll first need to add curtain grids to be able to add mullions later. You can go about this a couple different ways.
First you can click on the Modeling tab of the design bar and select the Curtain Grid button. Place your cursor over the edge of the glazing and left click to place. If you hover over the middle of the Curtain Wall you’ll notice your cursor snaps to the middle of the wall. The cursor snaps to one third and two thirds of the wall as well. After placing the curtain grids you can select each one individually and adjust it using the temporary dimens ions.
The other way is to go to the Element Properties → Type Parameters to change the look of the wall there. Here you have the ability to change the layout of the vertical and horizontal curtain grids as well as the mullion type for the curtain wall. You should know however, that by using this method you are pinning the curtain grids to their specific locations. You can still move them using their temporary dimensions, but you’ll have to unpin them first.
Remember, if your curtain wall has a radius to it, it will look straight until you add curtain grids. It’s a segmented radius like you might expect from a curtain wall. So there you have it. If you’ve never created a curtain wall before, this should help you. If you have, I hope you learned something new.
ions.
The other way is to go to the Element Properties → Type Parameters to change the look of the wall there. Here you have the ability to change the layout of the vertical and horizontal curtain grids as well as the mullion type for the curtain wall. You should know however, that by using this method you are pinning the curtain grids to their specific locations. You can still move them using their temporary dimensions, but you’ll have to unpin them first.
Remember, if your curtain wall has a radius to it, it will look straight until you add curtain grids. It’s a segmented radius like you might expect from a curtain wall. So there you have it. If you’ve never created a curtain wall before, this should help you. If you have, I hope you learned something new.

