Importing Data: Revit will import the following file types: DWG (AutoCAD) DGN (Microstation) SKP (Sketch Up) SAT (ACIS 3D Model File)
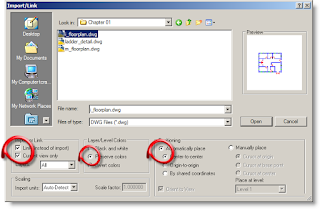
Import Settings (DWG) Once you have sufficient data to use, open Revit to begin a new project. You shouldn't have to worry about things such as line types, text styles, or families, because they are apart of the project template. We'll discuss the project template in a different post. Choose these setting when importing dwg data to use as a background:

Link instead of import because you never know when the dwg might change, and it doesn't take up as much memory as does straight importing. It should be pointed out that even though linking a dwg is better than importing, you should always be aware that the more dwg's imported into the project the slower it will run. To avoid this you should delete files no longer necessary to the project. Current view only to take advantage of the option on the option bar allowing you to toggle between foreground and background. Preserve colors so you will be able to tell the difference between your model and the dwg lines. Automatically place Center-to-center Revit will search for the center of the dwg and place it into the center of your Revit project. It is possible to acquire the coordinates of the dwg. Typically the civil engineer will use these coordinates to begin their drawing in AutoCAD. We will discuss how to do this in an upcoming post.
Adding Walls Start by making sure the settings for your wall are correct. Do this by checking the Options Bar at the top of the View Window. After choosing the wall, you'll need to decide how you want to go about building your walls. On the Options Bar you can choose to either pick the lines in the DWG or draw the lines over the top of the DWG. Either way you must pay close attention to how the wall is being drawn. When you begin to draw you'll get a green dashed line showing where the Location Line is. This should help you determine how the wall is going to look once created. This video tutorial should help: Click here if you're on the SmithGroup network. Click here if you're not on the network.
No comments:
Post a Comment