Adding new Drafting and Model patterns
Ever find yourself looking for more fill patterns than what you find already in Revit? Well, I can tell you plenty of people do. In fact I was asked just today if I could create one that didn't already exist. It's not really that difficult to create a simply pattern. If you want a more complicated fill pattern such as sand, or concrete you'll have to create a pattern file in notepad following some specific rules. For this post I'll cover the easy method and save the difficult method for a Revit lunch and learn.
Before we go any further we should discuss the difference between Drafting and Model Patterns. Drafting patterns typically show up when you are cutting a section through a component. For example, a wall is made up of specific layers of materials. When cutting a section through the wall you will find a specific pattern for each material. These patterns are Drafting Fill Patterns. Drafting Fill Patterns act much like a hatch patterns in AutoCAD. Model Fill Patterns are a little more sophisticated than DFP. They are typically used as surface patterns on walls, roofs, or ceilings. The reason you would use a MFP on the surface of these components is because you can select them independently of the component. For example, I have a wall with a 8x8x16 MFP as its surface pattern. I have the ability to align the pattern with the edge of the wall so I don't get an odd condition there. Openings in the wall now appear in the right place avoiding odd conditions as well. OK, on with the post.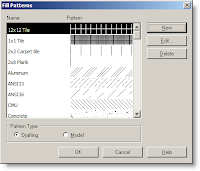 Open Revit and click Settings → Fill Patterns... the Fill Patterns dialog opens. Choose what type of pattern you are going to create and select New. Selecting New will take you to the New Pattern dialog. Here we should discuss the Orientation in Host Layers. You can control the orientation of the pattern, but only in Host Layers, meaning the layer of a wall, floor or roof. It DOES NOT work on a filled region.
Orient To View: Selecting this option will orient the pattern to the view you are in regardless of angle or placement of its host.
Keep Readable: Revit will determine the best orientation for the fill
Open Revit and click Settings → Fill Patterns... the Fill Patterns dialog opens. Choose what type of pattern you are going to create and select New. Selecting New will take you to the New Pattern dialog. Here we should discuss the Orientation in Host Layers. You can control the orientation of the pattern, but only in Host Layers, meaning the layer of a wall, floor or roof. It DOES NOT work on a filled region.
Orient To View: Selecting this option will orient the pattern to the view you are in regardless of angle or placement of its host.
Keep Readable: Revit will determine the best orientation for the fill 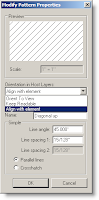 patter for the best possible result.
Align with Element: Revit essentially freezes the pattern inside the host, so no matter what you do the patter will always keep the same angle.
Line Angle: I hope this is self explanatory.
Line Spacing: Remember the scale is 1"=1" and this can't be changed for a simple pattern.
Line Spacing 2: You need this only if you choose Crosshatch instead of Parallel lines. You can have two different line spacings.
Once you have your setting selected you can click OK and you're done.
patter for the best possible result.
Align with Element: Revit essentially freezes the pattern inside the host, so no matter what you do the patter will always keep the same angle.
Line Angle: I hope this is self explanatory.
Line Spacing: Remember the scale is 1"=1" and this can't be changed for a simple pattern.
Line Spacing 2: You need this only if you choose Crosshatch instead of Parallel lines. You can have two different line spacings.
Once you have your setting selected you can click OK and you're done.
Welcome to revitED!
RevitED (Revit Education) and general BIM topics. I've been using Revit now for 11 years, and though I feel I've got a pretty good handle on the software it seems each day I learn something new. I want to share that with the readers of this blog and hope you learn something new as well.
 Open Revit and click Settings → Fill Patterns... the Fill Patterns dialog opens. Choose what type of pattern you are going to create and select New. Selecting New will take you to the New Pattern dialog. Here we should discuss the Orientation in Host Layers. You can control the orientation of the pattern, but only in Host Layers, meaning the layer of a wall, floor or roof. It DOES NOT work on a filled region.
Orient To View: Selecting this option will orient the pattern to the view you are in regardless of angle or placement of its host.
Keep Readable: Revit will determine the best orientation for the fill
Open Revit and click Settings → Fill Patterns... the Fill Patterns dialog opens. Choose what type of pattern you are going to create and select New. Selecting New will take you to the New Pattern dialog. Here we should discuss the Orientation in Host Layers. You can control the orientation of the pattern, but only in Host Layers, meaning the layer of a wall, floor or roof. It DOES NOT work on a filled region.
Orient To View: Selecting this option will orient the pattern to the view you are in regardless of angle or placement of its host.
Keep Readable: Revit will determine the best orientation for the fill 
 patter for the best possible result.
Align with Element: Revit essentially freezes the pattern inside the host, so no matter what you do the patter will always keep the same angle.
Line Angle: I hope this is self explanatory.
Line Spacing: Remember the scale is 1"=1" and this can't be changed for a simple pattern.
Line Spacing 2: You need this only if you choose Crosshatch instead of Parallel lines. You can have two different line spacings.
Once you have your setting selected you can click OK and you're done.
patter for the best possible result.
Align with Element: Revit essentially freezes the pattern inside the host, so no matter what you do the patter will always keep the same angle.
Line Angle: I hope this is self explanatory.
Line Spacing: Remember the scale is 1"=1" and this can't be changed for a simple pattern.
Line Spacing 2: You need this only if you choose Crosshatch instead of Parallel lines. You can have two different line spacings.
Once you have your setting selected you can click OK and you're done.
No comments:
Post a Comment