 Click Settings → Materials to access the Materials dialog. At the bottom of the left pane of the Materials dialog, click Duplicate. Or you can right-click a material in the list, and click Duplicate.
In the Duplicate Revit Material dialog, for Name, enter a name for the new material, and click OK.
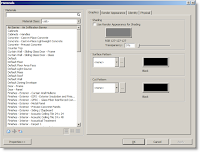
On the Graphics tab of the Materials dialog, specify display properties for the new material, and click Apply. To change how the material looks in shaded views (such as 3D views and elevations), under Shading, do the following:
If you want to use the render appearance to represent the material in shaded views, select Use Render Appearance for Shading. Revit Architecture calculates an average color for the render appearance and uses it to represent the material in 2D and 3D views whose model graphics style is Shading or Shading with Edges. Click the color swatch. In the Color dialog, select a color. Click OK.
For Transparency, enter a value between 0% (completely opaque) and 100% (completely transparent), or move the slider to the desired setting. To change how the outer surface of the material displays in views (such as plan views and section views), under Surface Pattern, do the following:
To change the Surface Pattern, click the arrow, and select a pattern from the list. To change the color that is used to draw the surface pattern, click the color swatch. In the Color dialog, select a color. Click OK.
To change how the cut surface of the material displays in views, under Cut Pattern, do the following:
To change the cut pattern, click the arrow, and select a pattern from the list. To change the color that is used to draw the cut pattern, click the color swatch. In the Color dialog, select a color. Click OK. Click Apply.
On the Render Appearance tab of the Materials dialog, specify a render appearance for the new material, and click Apply.
Do the following:
If you want to...
change the preview of the render appearance
Then...
For Scene, select the desired scene from the list. Click Update Preview. The preview is a rendered image of the material. Updating the preview takes a moment while Revit Architecture renders the preview scene.
If you want to...
select a different render appearance
Then...
Click Replace. Select a render appearance. Click OK.
If you want to...
align the texture of the render appearance to the surface pattern of the material
Then...
Use the Texture Alignment tool to align the texture of the render appearance to the surface pattern of the material (defined on the Graphics tab of the Materials dialog). When you render a 3D view, the rendered image displays the texture, positioned as specified using the Texture Alignment tool.
If you want to...
change properties of the render appearance
Then...
In the lower part of the Render Appearance tab, change property values. The properties vary depending on the type of render appearance.
Note: The render appearance can affect the amount of time required to render an image.
If you want to...
update the preview to reflect changes
Then...
Click Update Preview. The preview is a rendered image of the material. Updating the preview takes a moment while Revit Architecture renders the preview scene.
Click Apply.
On the Identity tab of the Materials dialog, enter information about the new material, and click Apply.
(Optional) On the Physical tab of the Materials dialog, specify physical parameters for the new material, and click Apply.
To exit the Materials dialog, click OK.
Click Settings → Materials to access the Materials dialog. At the bottom of the left pane of the Materials dialog, click Duplicate. Or you can right-click a material in the list, and click Duplicate.
In the Duplicate Revit Material dialog, for Name, enter a name for the new material, and click OK.
On the Graphics tab of the Materials dialog, specify display properties for the new material, and click Apply. To change how the material looks in shaded views (such as 3D views and elevations), under Shading, do the following:
If you want to use the render appearance to represent the material in shaded views, select Use Render Appearance for Shading. Revit Architecture calculates an average color for the render appearance and uses it to represent the material in 2D and 3D views whose model graphics style is Shading or Shading with Edges. Click the color swatch. In the Color dialog, select a color. Click OK.
For Transparency, enter a value between 0% (completely opaque) and 100% (completely transparent), or move the slider to the desired setting. To change how the outer surface of the material displays in views (such as plan views and section views), under Surface Pattern, do the following:
To change the Surface Pattern, click the arrow, and select a pattern from the list. To change the color that is used to draw the surface pattern, click the color swatch. In the Color dialog, select a color. Click OK.
To change how the cut surface of the material displays in views, under Cut Pattern, do the following:
To change the cut pattern, click the arrow, and select a pattern from the list. To change the color that is used to draw the cut pattern, click the color swatch. In the Color dialog, select a color. Click OK. Click Apply.
On the Render Appearance tab of the Materials dialog, specify a render appearance for the new material, and click Apply.
Do the following:
If you want to...
change the preview of the render appearance
Then...
For Scene, select the desired scene from the list. Click Update Preview. The preview is a rendered image of the material. Updating the preview takes a moment while Revit Architecture renders the preview scene.
If you want to...
select a different render appearance
Then...
Click Replace. Select a render appearance. Click OK.
If you want to...
align the texture of the render appearance to the surface pattern of the material
Then...
Use the Texture Alignment tool to align the texture of the render appearance to the surface pattern of the material (defined on the Graphics tab of the Materials dialog). When you render a 3D view, the rendered image displays the texture, positioned as specified using the Texture Alignment tool.
If you want to...
change properties of the render appearance
Then...
In the lower part of the Render Appearance tab, change property values. The properties vary depending on the type of render appearance.
Note: The render appearance can affect the amount of time required to render an image.
If you want to...
update the preview to reflect changes
Then...
Click Update Preview. The preview is a rendered image of the material. Updating the preview takes a moment while Revit Architecture renders the preview scene.
Click Apply.
On the Identity tab of the Materials dialog, enter information about the new material, and click Apply.
(Optional) On the Physical tab of the Materials dialog, specify physical parameters for the new material, and click Apply.
To exit the Materials dialog, click OK.
Friday, August 1, 2008
Adding Materials
Creating Revit materials may sound a bit intimidating, but honestly it’s pretty straight forward. This post will cover how to create and use new materials in Revit Architecture 2009.
To create a material, first find an existing material that is as close as possible to the new material. For example, the existing material should have the same material class as the new material. It should also have many properties that are the same as or similar to the new material. This strategy reduces the amount of work you must perform to define the new material. It also increases the likelihood that the new material will perform as expected in the building model.
 Click Settings → Materials to access the Materials dialog. At the bottom of the left pane of the Materials dialog, click Duplicate. Or you can right-click a material in the list, and click Duplicate.
In the Duplicate Revit Material dialog, for Name, enter a name for the new material, and click OK.
On the Graphics tab of the Materials dialog, specify display properties for the new material, and click Apply. To change how the material looks in shaded views (such as 3D views and elevations), under Shading, do the following:
If you want to use the render appearance to represent the material in shaded views, select Use Render Appearance for Shading. Revit Architecture calculates an average color for the render appearance and uses it to represent the material in 2D and 3D views whose model graphics style is Shading or Shading with Edges. Click the color swatch. In the Color dialog, select a color. Click OK.
For Transparency, enter a value between 0% (completely opaque) and 100% (completely transparent), or move the slider to the desired setting. To change how the outer surface of the material displays in views (such as plan views and section views), under Surface Pattern, do the following:
To change the Surface Pattern, click the arrow, and select a pattern from the list. To change the color that is used to draw the surface pattern, click the color swatch. In the Color dialog, select a color. Click OK.
To change how the cut surface of the material displays in views, under Cut Pattern, do the following:
To change the cut pattern, click the arrow, and select a pattern from the list. To change the color that is used to draw the cut pattern, click the color swatch. In the Color dialog, select a color. Click OK. Click Apply.
On the Render Appearance tab of the Materials dialog, specify a render appearance for the new material, and click Apply.
Do the following:
If you want to...
change the preview of the render appearance
Then...
For Scene, select the desired scene from the list. Click Update Preview. The preview is a rendered image of the material. Updating the preview takes a moment while Revit Architecture renders the preview scene.
If you want to...
select a different render appearance
Then...
Click Replace. Select a render appearance. Click OK.
If you want to...
align the texture of the render appearance to the surface pattern of the material
Then...
Use the Texture Alignment tool to align the texture of the render appearance to the surface pattern of the material (defined on the Graphics tab of the Materials dialog). When you render a 3D view, the rendered image displays the texture, positioned as specified using the Texture Alignment tool.
If you want to...
change properties of the render appearance
Then...
In the lower part of the Render Appearance tab, change property values. The properties vary depending on the type of render appearance.
Note: The render appearance can affect the amount of time required to render an image.
If you want to...
update the preview to reflect changes
Then...
Click Update Preview. The preview is a rendered image of the material. Updating the preview takes a moment while Revit Architecture renders the preview scene.
Click Apply.
On the Identity tab of the Materials dialog, enter information about the new material, and click Apply.
(Optional) On the Physical tab of the Materials dialog, specify physical parameters for the new material, and click Apply.
To exit the Materials dialog, click OK.
Click Settings → Materials to access the Materials dialog. At the bottom of the left pane of the Materials dialog, click Duplicate. Or you can right-click a material in the list, and click Duplicate.
In the Duplicate Revit Material dialog, for Name, enter a name for the new material, and click OK.
On the Graphics tab of the Materials dialog, specify display properties for the new material, and click Apply. To change how the material looks in shaded views (such as 3D views and elevations), under Shading, do the following:
If you want to use the render appearance to represent the material in shaded views, select Use Render Appearance for Shading. Revit Architecture calculates an average color for the render appearance and uses it to represent the material in 2D and 3D views whose model graphics style is Shading or Shading with Edges. Click the color swatch. In the Color dialog, select a color. Click OK.
For Transparency, enter a value between 0% (completely opaque) and 100% (completely transparent), or move the slider to the desired setting. To change how the outer surface of the material displays in views (such as plan views and section views), under Surface Pattern, do the following:
To change the Surface Pattern, click the arrow, and select a pattern from the list. To change the color that is used to draw the surface pattern, click the color swatch. In the Color dialog, select a color. Click OK.
To change how the cut surface of the material displays in views, under Cut Pattern, do the following:
To change the cut pattern, click the arrow, and select a pattern from the list. To change the color that is used to draw the cut pattern, click the color swatch. In the Color dialog, select a color. Click OK. Click Apply.
On the Render Appearance tab of the Materials dialog, specify a render appearance for the new material, and click Apply.
Do the following:
If you want to...
change the preview of the render appearance
Then...
For Scene, select the desired scene from the list. Click Update Preview. The preview is a rendered image of the material. Updating the preview takes a moment while Revit Architecture renders the preview scene.
If you want to...
select a different render appearance
Then...
Click Replace. Select a render appearance. Click OK.
If you want to...
align the texture of the render appearance to the surface pattern of the material
Then...
Use the Texture Alignment tool to align the texture of the render appearance to the surface pattern of the material (defined on the Graphics tab of the Materials dialog). When you render a 3D view, the rendered image displays the texture, positioned as specified using the Texture Alignment tool.
If you want to...
change properties of the render appearance
Then...
In the lower part of the Render Appearance tab, change property values. The properties vary depending on the type of render appearance.
Note: The render appearance can affect the amount of time required to render an image.
If you want to...
update the preview to reflect changes
Then...
Click Update Preview. The preview is a rendered image of the material. Updating the preview takes a moment while Revit Architecture renders the preview scene.
Click Apply.
On the Identity tab of the Materials dialog, enter information about the new material, and click Apply.
(Optional) On the Physical tab of the Materials dialog, specify physical parameters for the new material, and click Apply.
To exit the Materials dialog, click OK.
Subscribe to:
Post Comments (Atom)
No comments:
Post a Comment